Booking Courses with TSS
This guide walks you through booking a course in TSS, from finding a class to managing it after you've booked. It covers what to click and where, so you know exactly what to expect each step of the way.
Important
You must use Google Chrome on a laptop or desktop, not a mobile device, to book your courses. You may also need to clear your web browser's cache and cookies.
Make sure you've reviewed the Preparing to Book guide or corresponding video before your booking window opens. The guide covers what to check ahead of time — including your holds, unit limits, and your booking window.
Incoming first-year & transfer undergraduates: Read the booking guide for new students.
Open Schedule of Classes and Search
Open the Schedule of Classes
To search for courses, go to your TSS homepage.
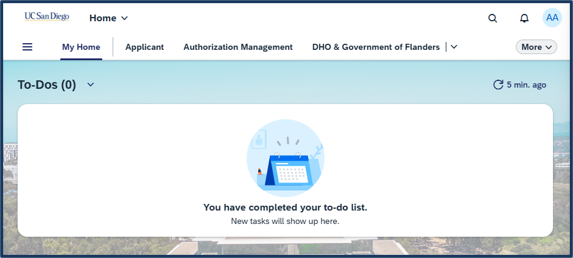
Click on the search bar.

Type Schedule of Classes into the search bar and click on Schedule of Classes.

- Because of this issue, we highly recommend you NOT drop from a waitlist to try to book a course that only has a few seats available.
- If you choose to leave the waitlist and the seat you are attempting to book is not actually available, you will lose your place in the waitlist. We cannot put you back into your previous place in the waitlist.
- If you choose to drop from the waitlist to attempt to book in this situation, we encourage you to carefully consider this possibility and its consequences before doing so.
Search for a Course
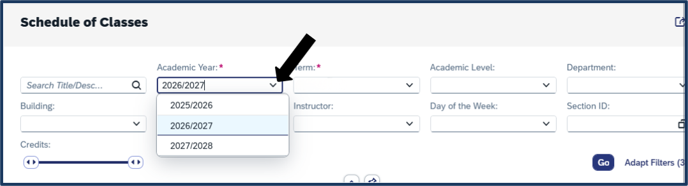
From the Schedule of Classes screen, select the academic year dropdown and click on the desired year.
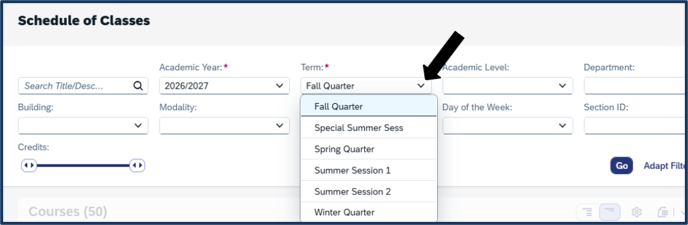
Select the Term dropdown and click on the desired term (e.g., Fall Quarter).
Click Go.
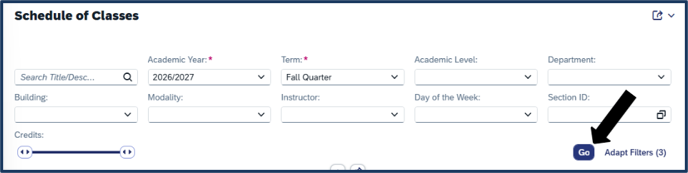
Your search results display a list of available courses for that term.
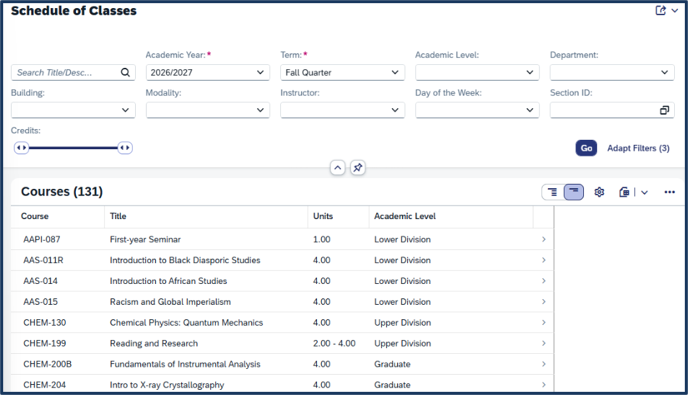
You can narrow your search by using one of the following filters at the top of the screen:
- Search Title/Description — keyword search across course titles and descriptions; useful when you don't know the exact course code
- Academic Level — filters by the level of courses (lower division, upper division, graduate, etc.)
- Department — narrows results to a specific academic department (e.g., Chemistry, Political Science)
- Building — filters by the physical building where the course meets; useful if you need to stay in a specific area of campus
- Modality — filters by how the course is delivered (e.g., in-person, remote, hybrid)
- Instructor — filters by a specific instructor's name
- Day of the Week — filters by which days the course meets (e.g., Monday/Wednesday/Friday only)
- Section ID — searches by the course's unique section identifier; useful if you already know the exact section you want
- Credits – filters by unit value; drag the slider to set a minimum and maximum so only courses within that unit range appear in results
NOTE: You can view a full list of Major codes for all programs on the Student Academic Info page.
Looking for your major's required courses? The Schedule of Classes app doesn't filter by major or program of study — course search is open to any student, regardless of major. To see which courses count toward your specific major, check the Catalog, your degree audit, or talk with your advisor.
Course numbers and section codes follow a specific format in TSS. Every course number includes a hyphen between the subject and the number, and lower-division courses include leading zeroes. For example: MATH-018, CHEM-006A.
Returning student? Course numbers you used previously map directly to TSS's format — for example, MATH 18 is now MATH-018.
Check Course Details: Booking Requirements & Other Info
Before booking a course, check whether it has any prerequisites or restrictions. TSS checks these automatically when you attempt to book — if you don't meet a requirement, your booking will be blocked.
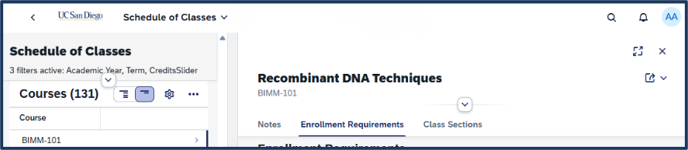
To view enrollment requirements for a course, select the course from your search results and look for an Enrollment Requirements tab.
No Requirements
From your search results, select the course you want to view.
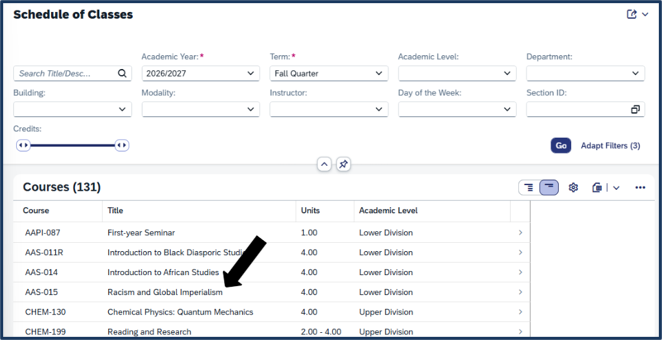
This opens the course detail panel. The course detail panel contains any Notes about the course, Enrollment Requirements, and Class Section information.
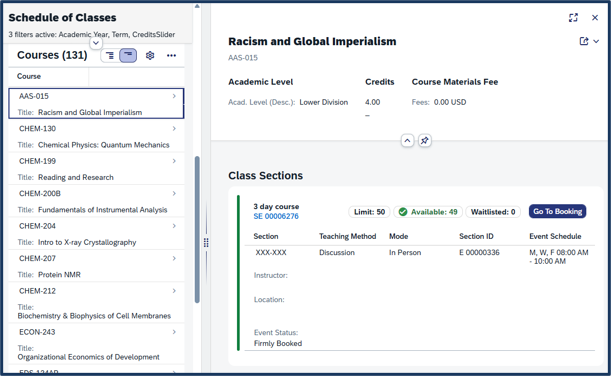
No Enrollment Requirements tab? If a course doesn't have an Enrollment Requirements tab, it has no prerequisites or restrictions and is open to any eligible student.
If your desired course does not have any booking requirements, it will appear like the image below (i.e., no Notes or Enrollment Requirements tabs visible).
If your desired course has a booking requirement or prerequisite, an “Enrollment Requirements” section will appear on the detail panel (see information below).
Prerequisite Groups
When a course has multiple prerequisites, they're organized into groups. You need to have completed — or be currently booked into — one course from each group, not every course listed. Review each group carefully before booking.
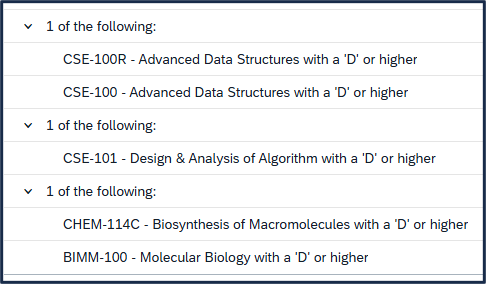
Course Restrictions
Some courses are restricted to specific groups of students — for example, by major, college, or class level. Restrictions appear in the same Enrollment Requirements tab as prerequisites.

Additional Course Info: Books, instructor evaluations
Each course page includes a few additional tools to help you plan:
-
View Textbooks — links to the bookstore site for required course materials. You'll still need to look up your specific section once there.
-
View in Catalog — jumps directly to the course's full catalog entry.
-
Course Evaluations (CAPE) — links to past student evaluations of the instructor and course, useful for comparing sections.

Booking Your Courses
Once you've found a course you want to take and confirmed you meet the requirements, you're ready to book within your assigned booking window.
Do Not Open Multiple Tabs
Opening multiple tabs or windows in TSS while booking can cause errors, lock you out of your account, or freeze your registration. For a smooth booking experience, keep only one TSS window open at a time. If you get locked out, close all TSS windows, wait a few minutes, then log back in.
Booking a Single Course
Step 1: Go to Booking
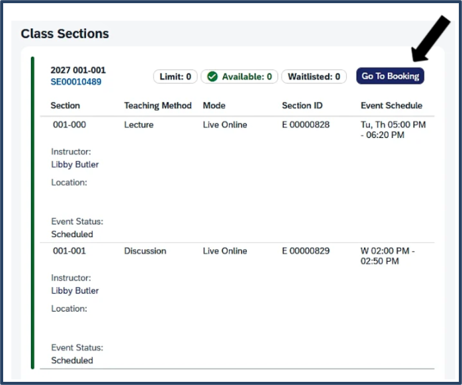
On the course detail panel, navigate to “Class Sections” and click Go To Booking.
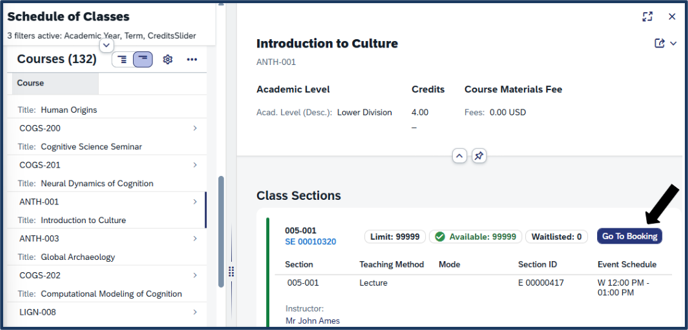
This takes you to the course booking screen.
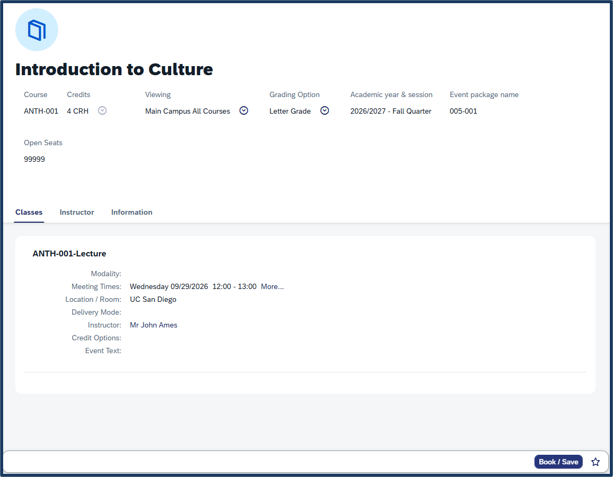
Step 2: Review Course Information
Review the following information at the top of the screen to confirm accuracy. Taking time to ensure these items for accuracy will save you a headache in the future:- Course
- Credit Hours or Units (if applicable)
- Viewing Campus
- Grading Option
- Academic Year & Session

If the credits or grading option is incorrect or need to be changed, continue to OPTIONAL Steps 3 and/or 4 below. If no changes are needed, continue to Step 5.
Transitioning from undergraduate to graduate?
It’s critical that you check the selected Viewing Campus prior to booking your course. This ensures you are booked under the appropriate academic level. When booking, you can only book under one academic level. If you have completed your undergraduate degree and your DDA paperwork has been processed, select GR in the booking module for all of your bookings.
On the course booking page, locate the Viewing dropdown near the top of the page.

Select the appropriate viewing campus by clicking on the radio button next to Main Campus All Courses (UN) or Main Campus All Courses (GR). Click Close.

OPTIONAL Step 3: Select Your Grading Option
You can choose your grading option (letter grade or UG: pass/ no pass; GR: satisfactory/ unsatisfactory) before you book. Every course has a default, so you'll never be left without one; when letter grade is available, it's automatically the default. If you’re an undergraduate student and would rather take the course as pass/ no pass, or a graduate student and would like to take the course as satisfactory/ unsatisfactory, select that option before booking — but check with your academic advisor first to make sure it's the right choice for your situation.
On the course booking page, locate the grading option dropdown near the top of the page.
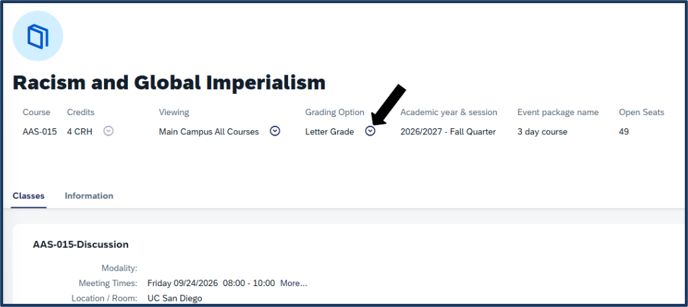
Select the appropriate grading option by clicking on the radio button next to Letter Grade or Pass/No Pass. Click Close.
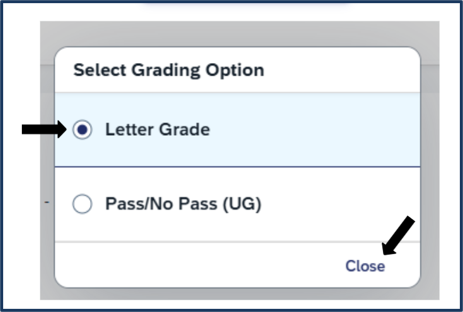
Note: Graduate courses may see Satisfactory/ Unsatisfactory (GR) as an option rather than Pass/ No Pass (UG).
Want to change your grading option or credit hours AFTER booking?
- Undergraduate students can make changes to grading options or credit hours (if applicable) in My Courses through the deadline to do so.
- Graduate students can make changes to grading options or credit hours (if applicable) in My Courses through the Friday of Week 2. Change requests after Friday of Week 2 need to be submitted in TEA through the deadline to do so.
- See the corresponding instructions under Other Booking Tasks below.
OPTIONAL Step 4: Select Credit Hours (Variable Unit Courses Only)
Some courses, typically special studies courses, let you choose how many units you'll earn.

If the course is a variable-unit course, the credit hour selector will appear on the booking page.
Click the dropdown and select the number of units you want to book.
⚠️NOTE for Financial Aid Recipients: The number of units you book may affect your financial aid eligibility. If you're unsure, check with the Financial Aid Office before finalizing your selection.
Step 5: Book Your Course
Once your course details are confirmed to be correct, click Book/Save.
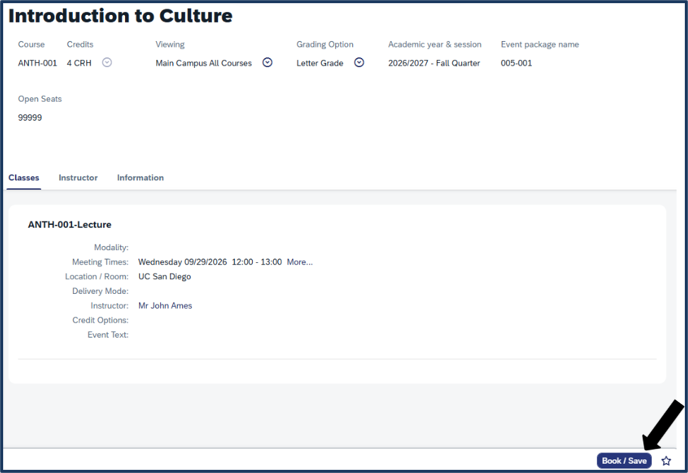
Once booked, a confirmation message appears at the bottom of the screen and the course's status changes to Booked.


Note: If a prerequisite, restriction, or department approval requirement is blocking you from booking a course, you can request an exception through TEA. Read Requesting Triton Enrollment Authorization (TEA) to learn how to submit a request.
Booking Multi-Component Courses
Some courses are made up of more than one linked component — for example, a lecture paired with a required discussion section or lab. These are called event packages.
Each component is shown with a short course code (for example, LE for lecture, DI for discussion). Required components are grouped together on the course page, so you can see what you need to book as a set.
From your search results, select the multi-component course you want to book.
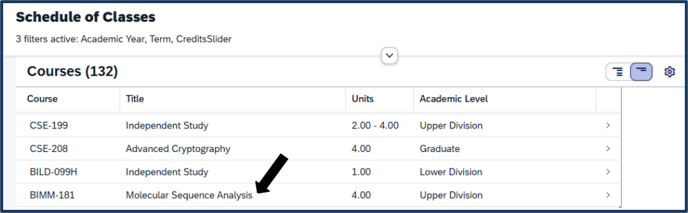
The course detail panel shows the required linked component(s) — for example, available discussion or lab sections — alongside the lecture.
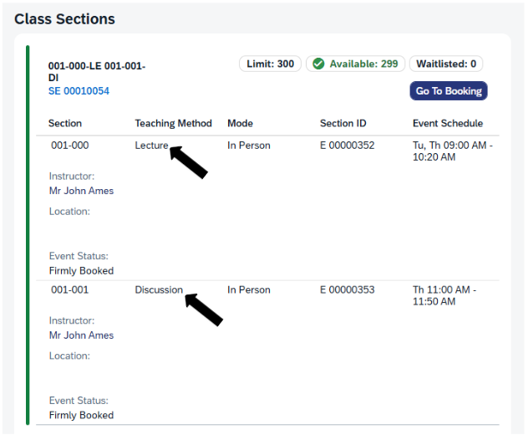
Click Go to Booking.
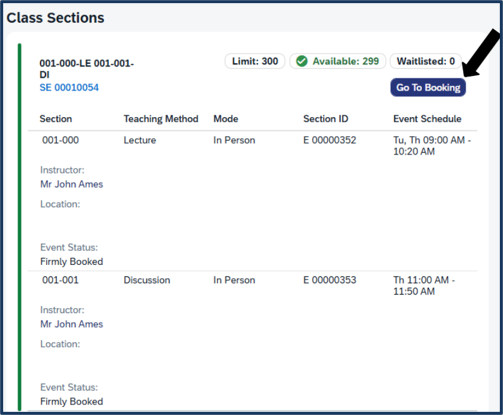
Note: Because required components are packaged together, this opens one booking flow covering all components.
Click Book/Save.
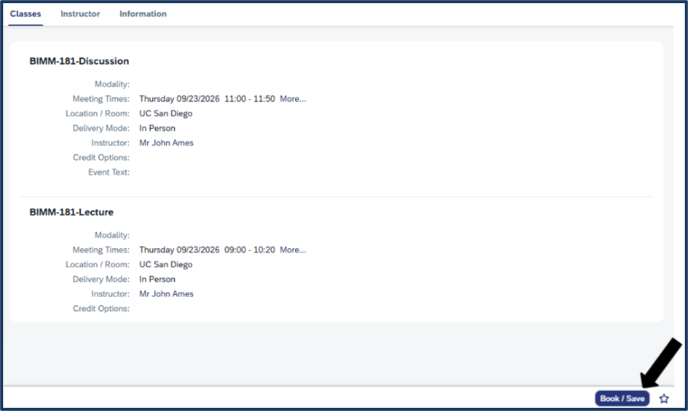
Note: Grading options apply to the package as a whole, not per component.
A confirmation message pops up on the screen, which books all required components together, and each linked component's status changes to Booked.
Confirm You Are Booked
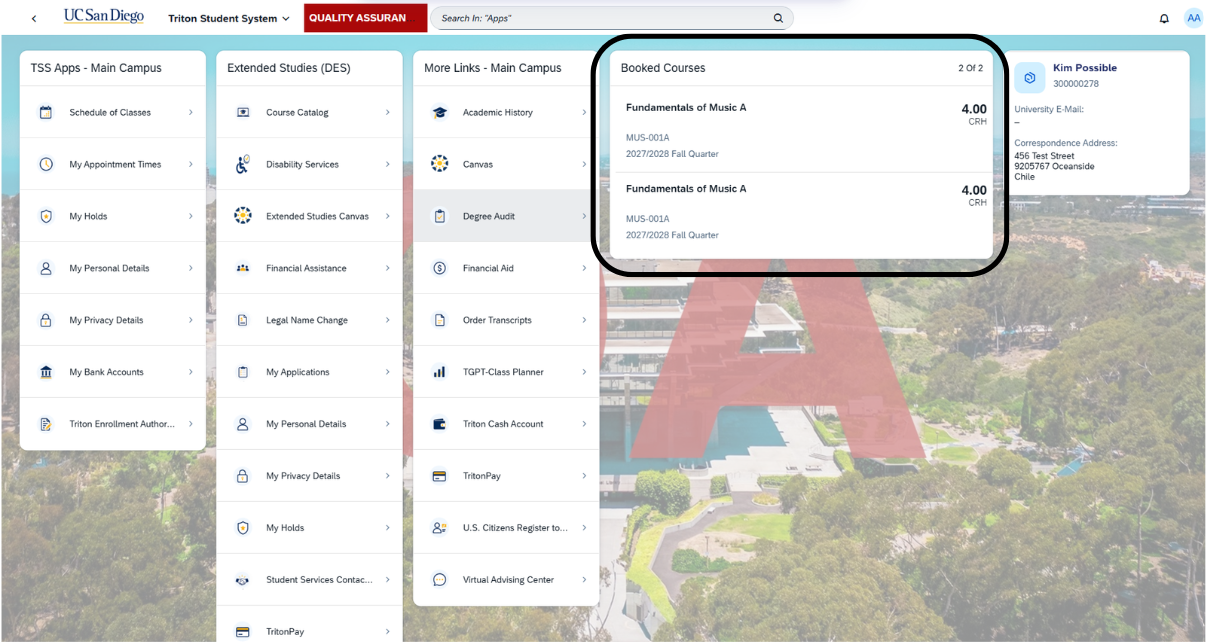
When you're logged into TSS, locate the Booked Courses tile.
Review the courses listed in the tile to confirm your course bookings.
Other Booking Tasks
Changing Your Grading Option
Already booked into a course and want to change your grading option? You can do that from My Modules / Courses, up until the deadline. Check the Enrollment and Registration Calendar for the deadlines for each term. Click on the Enrollment and Registration calendars for more information.
To search for your booked courses (modules), go to your TSS homepage.
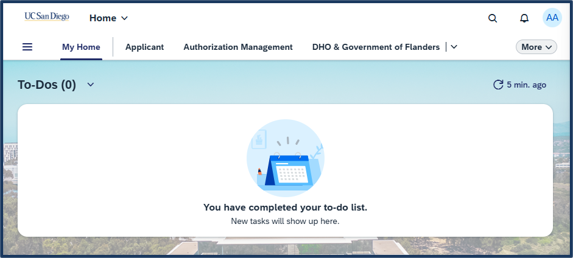
Click on the search bar. Type My Modules into the search bar and click on My Modules in Apps.

This screen shows all your booked modules/courses. Select the course on which you want to change the grading option.
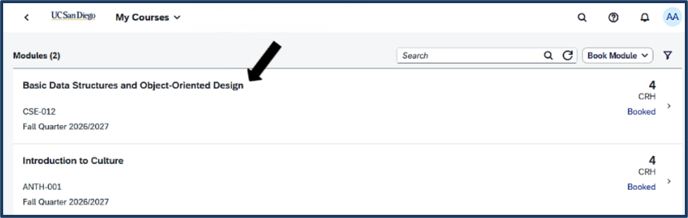
Locate the grading option dropdown arrow and click the arrow to open it.
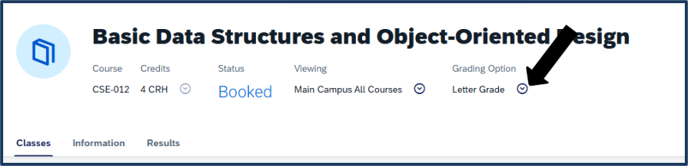
Select your new grading option by clicking the radio button next to the applicable option.
Note: Graduate courses may see Satisfactory/ Unsatisfactory (GR) as an option rather than Pass/ No Pass (UG).

Click Book/Save to save the change.

Changing Your Credit Hours After Booking (Variable-Unit Courses Only)
You can update the units on a variable-unit course you have already booked without dropping and re-adding it.
🎓 Note for graduate students:
- Through Friday of Week 2: Change your units in My Courses using the steps below.
- After Friday of Week 2: Submit a TEA request by the applicable deadline and select Change, not Add, as the Request Action. Once approved, the system updates your existing booking; you do not need to drop or book the course again.
Go to your TSS homepage and click View All Courses (Click here).
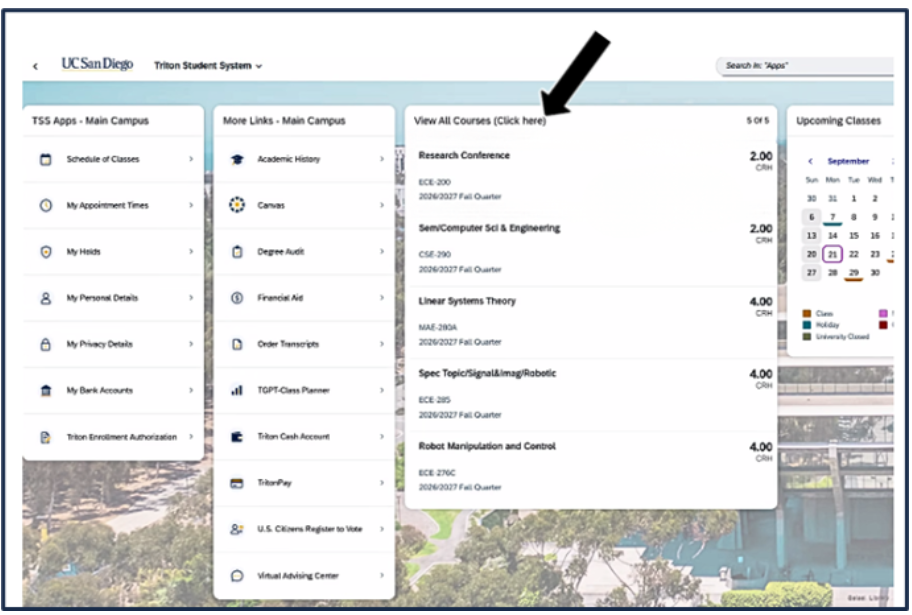
Select the variable-unit course you want to update.
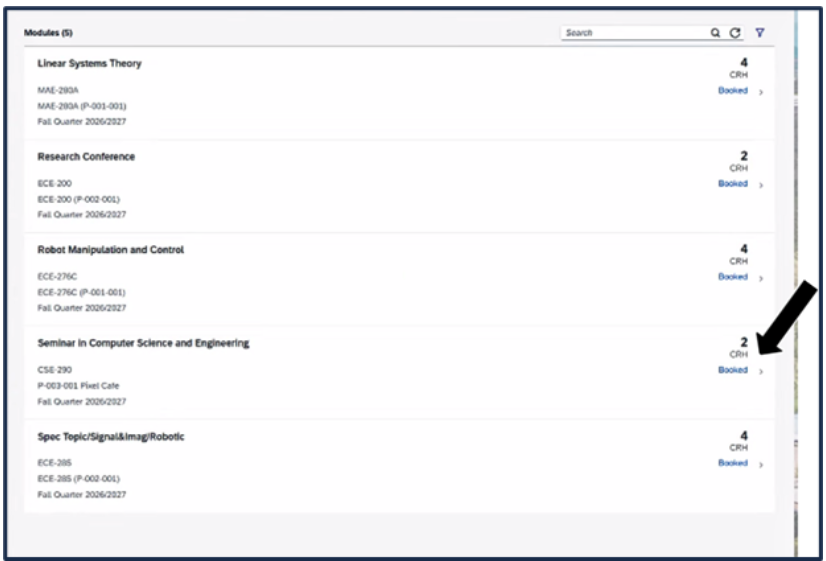
On the course detail page, locate the Credit field and click the dropdown arrow next to the units.
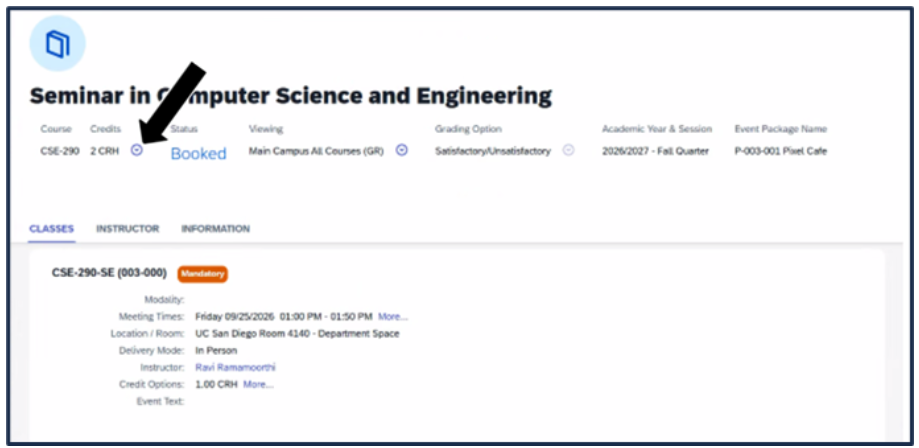
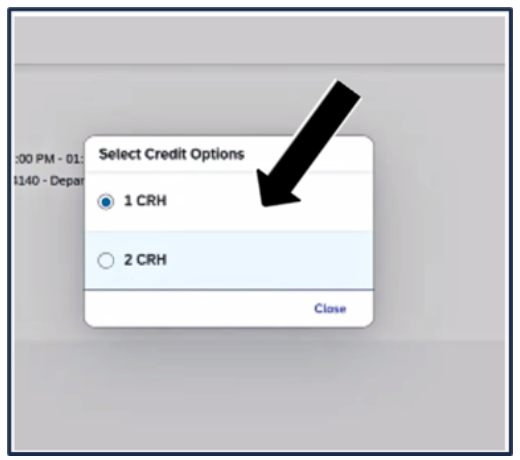
A pop up window appears showing your available credit hour options. Select the radio button for the number of units you want.
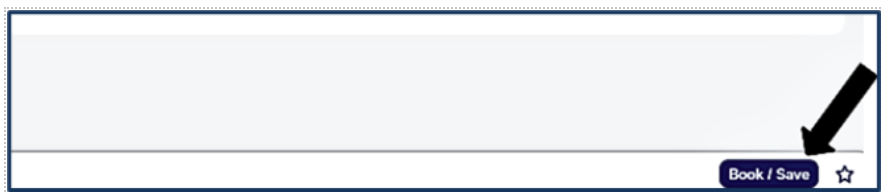
Click Book/Save at the bottom of the screen to save the change.
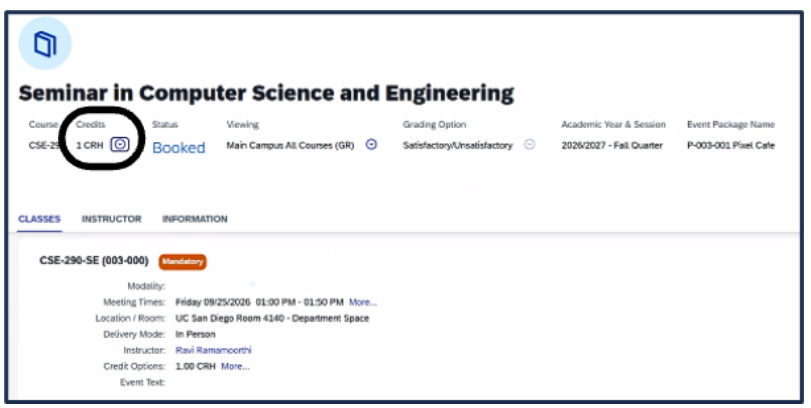
Once saved, a confirmation message appears on screen.

Your updated credit hours will display at the top of the course page.
Cancelling / Dropping a Course
Important notes about cancelling / dropping courses
- IMPORTANT: Continuing undergraduate students should use caution when dropping a course outside of an active Booking Window. The option to drop a course remains available even when your Booking Window is not active. Review your Booking Window in My Appointment Times before dropping a course.
- Graduate Students: You can drop a course through My Courses through Friday of Week 2. After that point, you'll need to submit a drop request via TEA through the drop deadline to do so.
- Graduate students changing units: Do not drop your course to update its units. If it is your only booked course that term, you cannot drop it. Follow the unit-change instructions above.
-
For more information about academic deadlines, review the Enrollment and Registration Calendar.
Canceling a Single Course
You can cancel (drop) a course from My Modules / Courses.
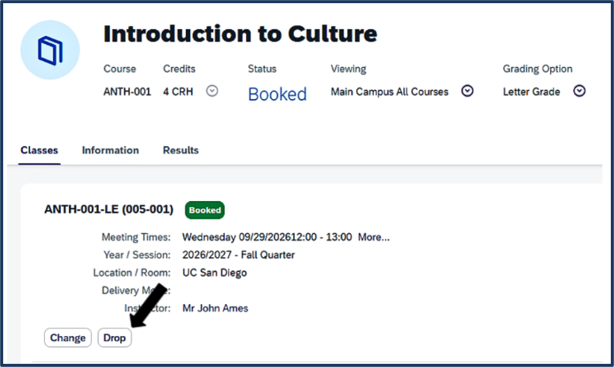
Go to My Modules / Courses and select the course you want to cancel/drop.

Click Drop.
Confirm by clicking OK when prompted "Would you like to drop this course?"
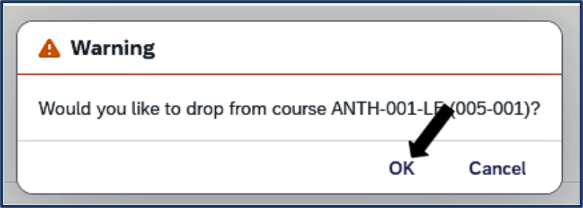
A confirmation message will pop up upon successful completion of the drop/cancellation.

The course(s) is now removed from your My Courses / Modules page.
Canceling a Multi-Component Course
Event packages cancel all components together. If you cancel one piece of a required package — like the lecture — the linked discussion or lab will also be cancelled. There's no way to cancel just one component and keep the rest.
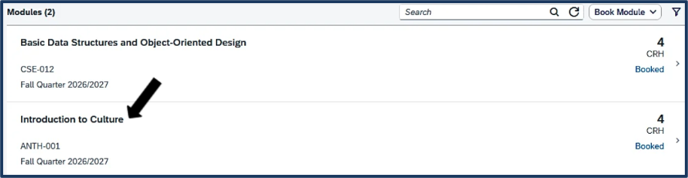
Go to My Modules / Courses and select the course you want to cancel/drop.
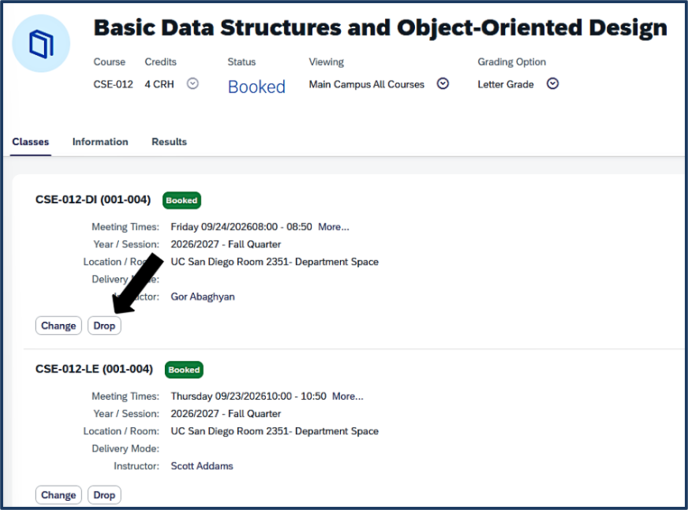
Click Drop on either portion of the course (ie. lecture or lab). Note: Both components will drop automatically.
Confirm by clicking OK when prompted "Would you like to drop this course?"
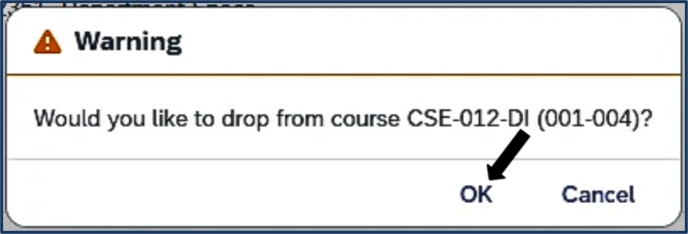
A confirmation message will pop up upon successful completion of the drop/cancellation.

Return to step 2 and drop/cancel the other component of the course. You will be prompted to click “OK,” then will receive the same confirmation.
The courses are now removed from your My Courses / Modules page.
Drop Deadlines
Graduate Students: You can drop a course through My Courses through Friday of Week 2. After that point, you'll need to submit a drop request via TEA through the drop deadline to do so. Please note: Graduate students may not drop below 1 unit in any quarter.
For more information about academic deadlines, review the Enrollment and Registration Calendar.
⚠️NOTE for Financial Aid Recipients: The number of units you book may affect your financial aid eligibility. If you're unsure, check with the Financial Aid Office before finalizing your selection.
Waitlists
Waitlists run from second pass through Friday of Week 2 (the add deadline). After that, waitlist processing ends for the term, even if seats become available. Read more about How to Waitlist a Class (includes timing for waitlisted courses).
To find out if a waitlist is available for a course, follow Steps 1 and 2 from Booking a Single Course above to reach the booking screen and check the course status:
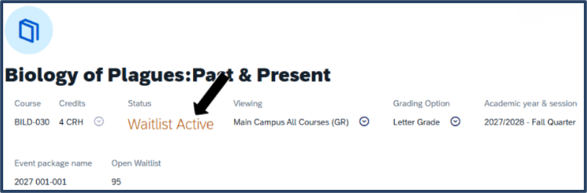
- Waitlist Active — the waitlist is open and you can add yourself to it
- Waitlisted — you're already on the waitlist for this course
- Waitlist Inactive — the waitlist exists but is not currently accepting new additions; waitlisting may not be available for this section
Joining the Waitlist
Follow Step 1 and 2 from Booking a Single Course above to reach the booking screen.
From your search results, select the course you want to waitlist.
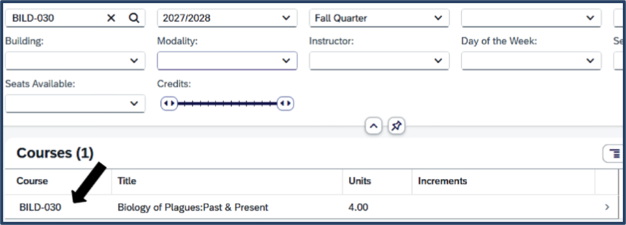
Click Go to Booking to reach the booking screen.
On the booking screen, confirm the status shows Waitlist Active.
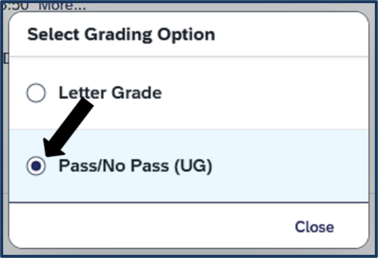
Select your grading option by clicking the dropdown beneath the Grading Option title.
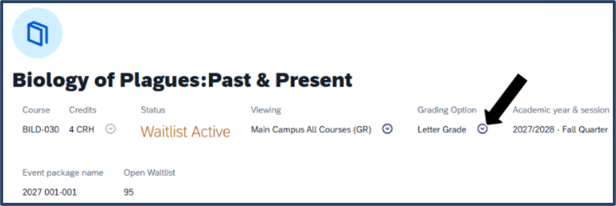
Select your preferred option by clicking the appropriate radio button.
Notes: The same principles as regular booking apply. Whichever option you choose will be applied automatically if a seat becomes available and you're enrolled. Graduate courses may see Satisfactory/ Unsatisfactory (GR) as an option rather than Pass/ No Pass (UG).
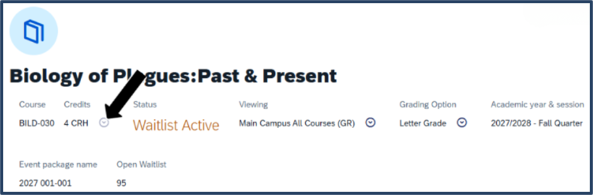
If the course is a variable-unit course, the credit hour selector will appear on the booking page. Click the dropdown and select the number of units you want to book.
Click Book/Save to join the waitlist.

Once added, a confirmation message appears on the screen. Click OK.

Your status will update to Waitlisted and show your Waitlist Position.
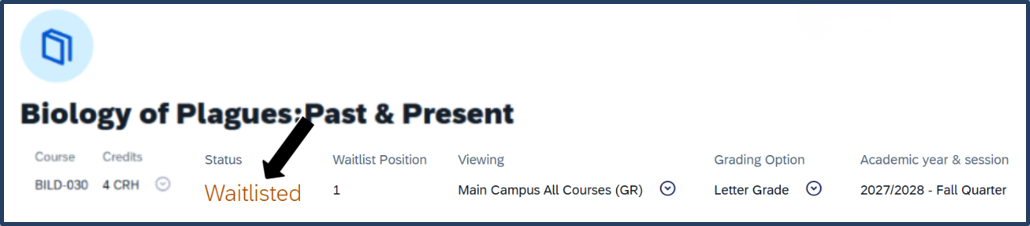
You'll also see a notification message letting you know:


While You're on the Waitlist
You can view your waitlisted courses under your My Courses tile on your Student Overview Homepage. Waitlisted courses do count toward your unit limit.
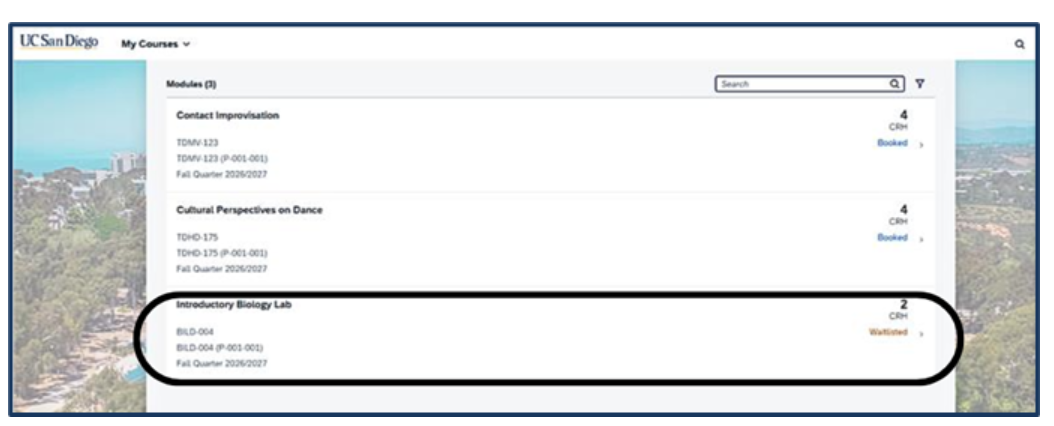
If a seat opens up, you'll be moved in automatically and in real time — there's no need to keep checking back. Your status on your Student Overview Homepage will change from Waitlisted (shown as Booked on Waitlist) to Booked once you're in.
You may use the drop function to remove yourself from a waitlist, if needed.
After Friday of Week 2, you will remain on the waitlist unless you remove yourself, but you will no longer be automatically enrolled, even if a seat becomes available.
To request a late add after waitlist processing ends, use the Drop option to remove yourself from that course’s waitlist. Then submit a TEA late-add request. Remaining on the waitlist prevents you from submitting that request.
Read more about How to Waitlist a Class (includes timing for waitlisted courses).
Approved to bypass the waitlist?
If your Triton Enrollment Authorization (TEA) request is approved for a specific section while you’re waitlisted for the course, you must leave the waitlist before booking that section. The system will not let you be waitlisted and book the same course at the same time.
- Confirm that your approval applies to the section you intend to book.
- Drop yourself from the course waitlist. You will lose your current waitlist position.
- Return to the course and book the approved section. Confirm that its status changes to Booked.
If you cannot complete the booking, your former waitlist position cannot be restored. See Requesting Triton Enrollment Authorization (TEA) for information about approvals.
Understanding Your Course Status
|
Status |
What it means |
|---|---|
|
Booked |
You're enrolled in the course |
|
Conditionally Booked |
You're booked in the class but need to complete an enrollment requirement (like a prerequisite or major restriction) before the course begins. You may be waiting for a final grade in the prerequisite course, or you may have received a Conditional Approval via TEA. Failure to meet the condition before the course begins could result in you being dropped from the course. |
|
Waitlisted |
You're on the waitlist for this course |
|
Waitlist Active |
The course is full but the waitlist is open — you can add yourself to it |
|
Waitlist Inactive |
The course is full and the waitlist is unavailable |
|
Blank |
You're not enrolled in or waitlisted for this course |